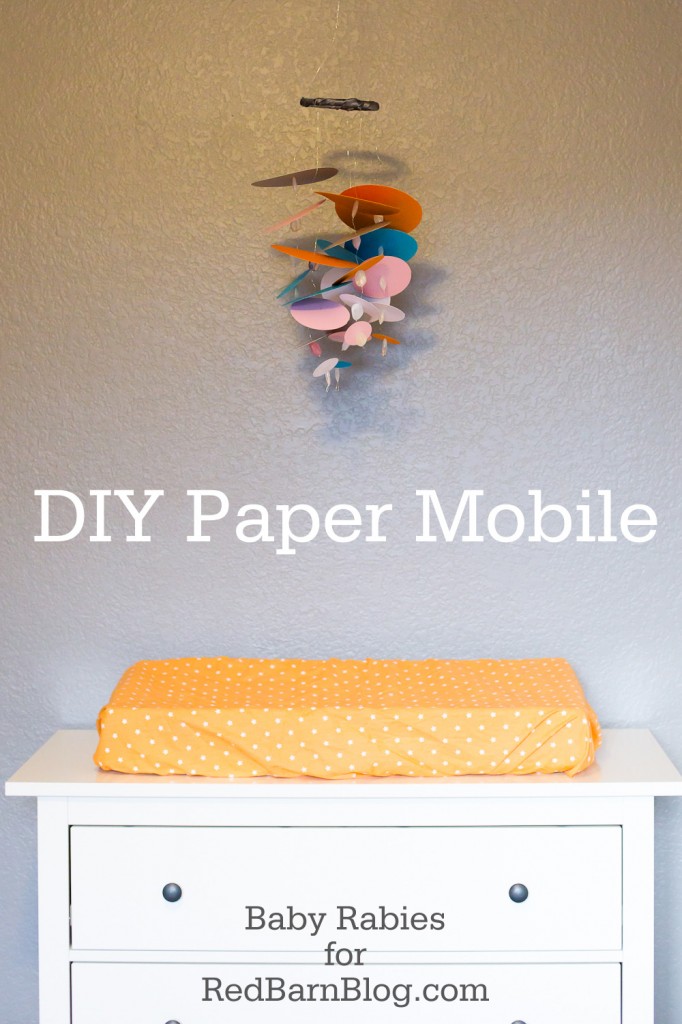
My trip to the Ritz-Carlton in Laguna Niguel this month inspired this simple, paper mobile tutorial for the Red Barn Blog.

Head on over to RedBarnBlog.com get the full tutorial.

My trip to the Ritz-Carlton in Laguna Niguel this month inspired this simple, paper mobile tutorial for the Red Barn Blog.
Head on over to RedBarnBlog.com get the full tutorial.
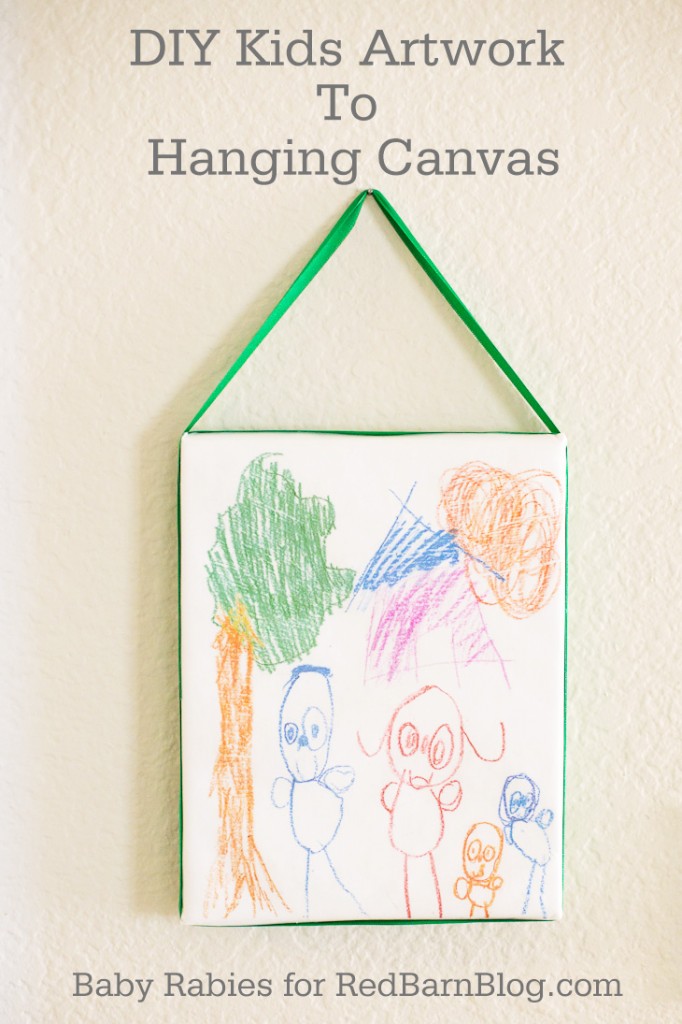
My Decor & Cool Spaces post for this month is up over on the Red Barn Blog! This time I took on the challenge of finding a way to display kids artwork that blends well with the rest of our wall decor.
Head on over to my post on RedBarnBlog.com to see the full tutorial.

Okay, I know.. I know.. Easter is far behind us. Nobody actually has leftover Easter candy hanging around at this point, right? Maybe?
Well, even if you don’t, consider these ideas for next year (or run out and get some PEEPS for 90% off somewhere, I guess).

I was on D Living last week, showing off some leftover PEEPS recipes. Here’s what I came up with:
PEEPS S’mores
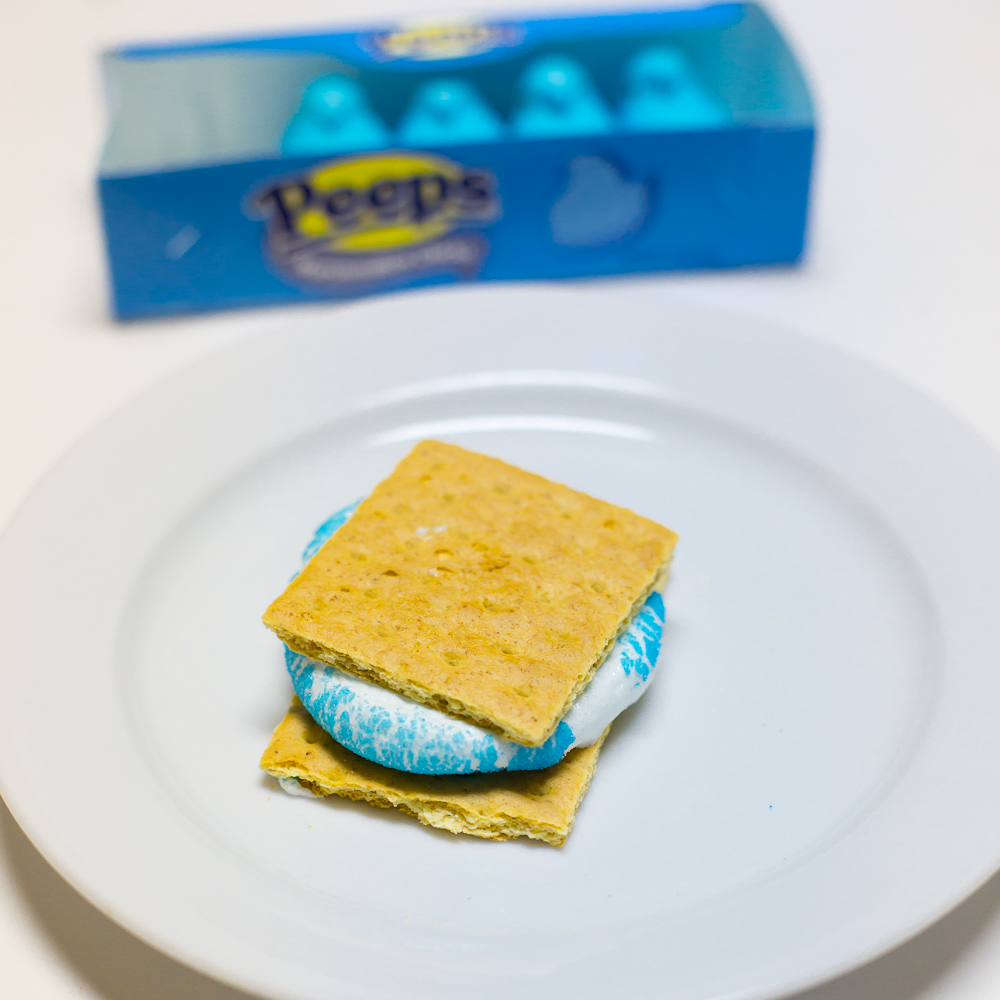
Pretty simple. Graham cracker, chocolate, PEEP. Melt and smoosh as desired. BONUS! Use leftover chocolate easter candy for the chocolate. I beheaded a chocolate bunny for mine, but you could also get creative and use Hershey’s Kisses, M&Ms, even try it with Reeses Peanut Butter Cups.
If you’re going to do this in the microwave, just be sure to keep a close eye on your PEEP. It only took about 9 seconds in mine before it puffed up really big. STOP IT WHEN IT DOES THAT. Because, you know, PEEP explosions are not fun to clean up.
PEEPS Fruit Salad
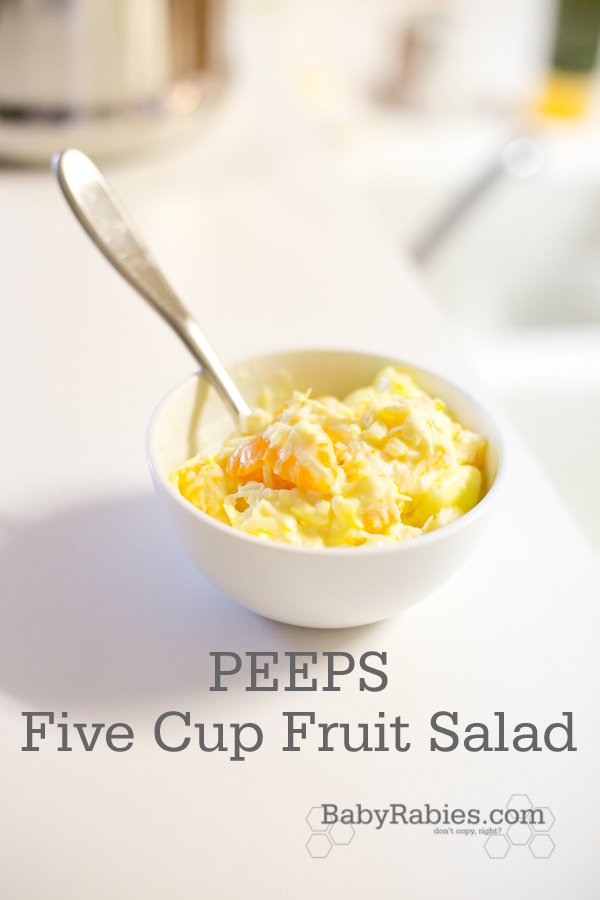
This is a recipe I adapted from a traditional 5 Cup Fruit Salad recipe I found on KraftRecipes.com.
1 can pineapple chunks, drained
1 can mandarin orange slices, drained
1 cup shredded coconut
1 cup Greek yogurt
1 cup cut up PEEPS
I substituted Greek yogurt for the sour cream because I basically use Greek yogurt for everything. I used cut up PEEPS in place of mini marshmallows. It’s easiest to cut them up using kitchen scissors. 1 row of PEEPS (5) equals a cup.
Mix all the ingredients together. Super simple, and surprisingly really good. I would only recommend the yellow PEEPS for this one because the colors do tend to bleed just a little, and I think any other color would look… gross.
PEEPS Colored & Layered Rice Krispie Treats
PEEPS are just marshmallows on crack, so you can use them just like marshmallows in recipes (in case that hasn’t been clear up to this point). These colored and layered Rice Krispie Treats were made with 4 colors of PEEPS.
The bottom layer is supposed to be purple, but I only used 5 PEEPS to make it, and the color was really light. I decided to use 7 PEEPS for the other layers, and that helped boost the color a lot without making it too gooey. For each layer, combine the following:
Melt 1 tablespoon of butter over medium/low heat
Add 7 PEEPS of one color and stir until melted
Add 1.5 cups of Rice Krispies
Stir until incorporated
Press into a buttered round cake pan
Then start all over with the next color, and press that layer on top of the previous layer. Continue doing this until you’ve got as many layers as you desire, or your pan is full. Let cool, then flip it out onto your serving plate or cake stand. To top, add PEEP dust! That’s just the leftover sugar at the bottom of the PEEPS boxes.
Here’s my D Living segment where I had a great time cutting off the heads of PEEPS and bunnies to demonstrate all these yummy recipes.

I pretty much despise dying Easter eggs. It never goes well for me, especially now that my kids are old enough to insist on actually doing it themselves and not watch me do it for them.
Related:
I love crafting. I love my children. I hate crafting with my children.
— Jill Krause (@babyrabies) March 26, 2013
Don’t feel too bad for them, though, because their father is some sort of super dad who loves doing stuff like that with them… when I’m not around.
Doesn’t mean I can’t have fun decorating eggs with them, though! Here are some dye-free ways to decorate Easter eggs.
First, STICKERS. Kids love stickers. I’m betting you have a ton of them hanging around, and there are loads of cute Easter themed stickers out right now. Check out the scrapbooking section of your craft store for dimensional stickers, but don’t be afraid to use up non-seasonal ones you have hanging around and even yard sale dot stickers!

While decoupage is nearly as messy as dye, I’ll admit, it won’t stain your fingers, and your clothes, and your counters, and… everything else. I don’t know about you, but I seem to hoard used tissue paper from gifts given to us. Half the time it’s too wrinkled or torn to use again, but it makes a great craft supply. Just tear it into little pieces and apply with a paint brush and a little Mod Podge. Let your imagination run wild, and combine colors and patterns.

Glitter. Okay, it’s messy. Okay, it’s slightly harder to clean up than decoupage. BUT, it’s… glittery! And this method keeps the mess to a minimum because there’s no glue required. Just apply some double sided tape or double sided dots to your egg, then roll it in some glitter until the sticky sides up are all covered.

Something about kids and tape… it’s like you’ve given them the key to the office supply closet. They get to play with tape? COOL! You used to only be able to find these colorful, patterned tapes at fancy paper stores, but now they’re in the office supply aisle of Target. Pick up a few colorful rolls and let the kids go crazy.

Finally… OMG. I love this last one. So, tattoos work on eggs. You just put them on like any regular tattoo. They look beautiful on them, too. You can use any kind of temporary tattoo you can find, BUT I am in LOVE with these little mustaches I found at Michael’s this week. They’re meant to go on your finger, but they are the perfect size for an egg! I simply used the fine end of a Sharpie to draw on the eyes and other features for these, but if I had more time, I would have gone wild with sticky googly eyes and yarn for hair.

I was on D Living today, showing off these dye-free egg decorating ideas. It’s really worth a watch if only to see the host’s face when I call glitter the “herpes of craft supplies” on live TV.
Also, thanks to Better Homes and Gardens. I got quite a few of these ideas from this post of theirs.

I’m prepping for a weekend of my kids on crack. And by crack, of course, I mean sugar. It’s really beyond my control. We’re going to be around a lot of family, and visiting homes that will have an abundance of candy, cookies and cakes out for the taking. What I can control, though, is what goes in the Easter eggs.
Here are some non-candy egg stuffer ideas.
For Leyna’s 2nd Easter, the first one she could really walk around and collect eggs, we stuffed all her eggs with alphabet magnets. One $5 bag was more than enough for all the eggs she could carry.

If you have older kids, I love this idea of printing off coupons for them. Not only are they a non-candy idea, but they’re free! I got the printable from MakingLifeWhimsical.com

Along those same lines, I love the idea of printing off a picture of something big, or something that you couldn’t put in an Easter basket, turning it into a puzzle and putting each piece in an egg. Then having the kids put the pieces together to figure out what it is. Take, for example, a family trip to Great Wolf Lodge! Because sometimes the very last thing we all need is more stuff, big or small.

And don’t overlook how fun it is to skip right past the traditional Easter basket, and let the container help you set the tone for the goodies. Have a budding fashionista in the family? Were you a child of the 80s and 90s? Did you know Caboodles are back? Oh yes, yes they are. Perfect containers for eggs stuffed with jewelry, hair clips, socks and – of course- Lip Smackers.

If you have any LEGO lovers in the house, fill the eggs with the bricks, and get one of these cool LEGO head containers instead of a basket. I got ours from the Container Store.

Finally, a watering can is a great alternative to a basket for collecting eggs stuffed with seeds. Put a trowel, garden shovel and some garden gloves in there, and your budding little green-thumb will be all set.

I got to show all these ideas off on D Living this morning. Check out the video below!

PEEPS! Love ’em or hate ’em- fresh or stale (officially Team Fresh PEEPS, BTW) they are pretty versatile. I mean, beyond eating them, you can blow them up, or you can craft with them. So much you can do with them!
Just check out this adorable video of all the real things people have done with them (those annotation bubbles that pop up are clickable, and link to examples!).
I took my inspiration from the colorful little sugar-coated mouthfuls of crack, and created my first ever Easter themed fireplace mantel!

I’m so excited to be on Texas Living today showing off this easy and healthy Valentine’s Day breakfast for the whole family with the last minute in mind. When they asked me to be on on the 13th to do something Valentine’s and craft related, I was at a loss. What could I show on the 13th that people would have time to do by the 14th?
Well, everyone’s got to eat, right? So I threw together a Valentine’s themed breakfast with more of a focus on fun than on sweets (since we all know there will be plenty of that the rest of the day).

Everything you need can be found at your local grocery store and craft store. If you’re lucky, the 2 will be close to each other and it will be a quick stop on the way home from work or errands.
For the table:
I covered it in white craft paper that I got at the craft/hobby store. You could also do brown packaging paper, which is sometimes found in the mail supply area at big box stores. In a pinch, just flip some old wrapping paper over, and cover the table white side up.
Then I used a red and pink Sharpie and drew “placemats” at each place with names above them and freehanded some hearts all around. I filled a few with what I loved about each person, and then left some empty hearts for the kids to color or to (tell me what to) write what they love about others in the family.

Dude. My handwriting. I KNOW. I don’t use those old fashioned writing devices much anymore. I’M A BLOGGER.
I bundled some crayons (leftover from the Valentines we made) and set them at each place setting because who doesn’t like drawing on a table?

For the food:
A grapefruit sliced in half. Put a heart shaped cookie cutter on it (can find at a craft store or maybe your grocery store), and sprinkle some sugar… okay, lots of sugar inside. Then remove the cookie cutter.


Use that same cookie cutter to cut hearts out of a couple pieces of toast.

Pick up a box of Quaker Oats Whole Hearts cereal at the grocery store, and a tub of strawberries. To make the strawberries look like hearts, just gently pull off the leaves and stems, use a sharp knife to cut a v-shaped wedge out of the top, then cut in half. Top the cereal with your heart strawberries and add milk… in case the cereal thing is new to you.


That heart-shaped egg thing? Amazingly easy. Get you some silicone heart-shaped cupcake molds. Like these, or these. You can find them at your craft store in the baking section, and possibly at your grocery store.
For 6 molds, whisk together 6 eggs, a couple tablespoons of half and half or milk, a tiny bit of salt and pepper, and about a 1/2 cup of shredded cheese. Bake them at 350 for about 20 minutes. (Best to do this first thing, before you start decorating the table, so they’ll be done when you’re ready.) Once they are out of the oven and cooled off a bit, it’s super easy to pop them right out and plop them on a plate. My kids just eat them with their hands.
Oh, and what about this cute cup of juice?!

As simple as freezing some cranberry or cherry (or cran-cherry, in my case) juice in some tiny heart ice cube molds and popping them in some orange juice just as everyone sits down to eat. You should be able to get the ice cube tray at the craft store. Similar to this.

Worst case scenario: Use the cupcake molds. Fill them just a little bit, and just put one giant heart ice cube in each juice glass.
That’s it! Hopefully, even if you don’t use all these ideas, there’s something in here you can pull off by Valentine’s morning that will put a smile on someone’s face. It’s not a crazy, fancy, uber styled tablescape and menu. Just some quick, fun, healthy ideas you can throw together quickly to create some fun family memories.
If you live in North Texas, look for me on Texas Living today! I’ll be showing all this off and demonstrating… how to pour cereal in a bowl? The show is on KTXD, and starts at noon. I’ll come back and post the video here later for those who miss it.

Procrastinators, relax! There is still time to come up with something cute for your kids’ Valentines, and I promise it will look like you spent way more time putting it together than it will actually take.

What you need:
9 x 12 sheets of felt (each sheet makes 2 pouches)
Ribbon (each pouch requires 6 inches of ribbon)
Hot glue gun and glue sticks
Fabric scissors
Ruler
Crayons (each pouch holds 8)
Optional:
Pinking shears
Color My World printable Valentines (download here)
Start by folding your sheet of felt in half, lengthwise, and cut down the middle.

Cut a piece of ribbon 6″ long, and wrap it around the front of the felt, one inch from the top, securing the excess on each side with hot glue to the back.

Fold the felt 4″ from the “top”… or bottom at this point? The edge where you put the ribbon closest to.

Run a bead of hot glue along each 4″ edge of the pouch (sides only, not the top) and adhere the sides together.
If you have pinking shears, use those to slightly trim the other edge of the pouch.
With regular scissors OR pinking shears (whatever you’re working with), cut the corners of this edge at an angle.

Fill with 8 crayons.
Most crayon boxes seem to come in multiples of 8. See how easy I made it for you?
Pro Tip: Buy in bulk and save. Michaels has all Crayola products for buy one get one 50% off right now, including mega boxes of 120 crayons.

Tuck top flap into the ribbon.

Print off these free Valentines! (But not actually THOSE… down there. That picture is a low-res version. CLICK HERE FOR THE HI-RES PRINTABLE.)

Not digging your printer quality? Check out places like Office Depot that let you email the file to them and pay online, so all you have to do is swing by and pick them up an hour later. I highly recommend printing them on cardstock.
Cut out and have your kids color them in for a personal touch. I had to help my 2 year old with her name, but she was thrilled to “co co” the hearts.

Slip the Valentine inside the ribbon of each pouch and you’re all set!

I would say it takes about 5 minutes (or a little less) to make one pouch, but you could get that time down if you do it assembly line style for several. That’s how I plan to spend my evening tomorrow. I’ve got 24 to make, and I anticipate dedicating an hour to it.
I hate that I got this up so late in the game, but you know me… the procrastinator. For all you fellow procrastinators looking for a last minute (candy free!) idea, I hope this helps!

A few weeks ago, I had a friend and her kids over for a playdate/Valentines photo shoot. I threw it together at the very last minute and couldn’t get out to shop for cute props and outfits.
So I pieced together whatever the kids had in their closets that were in the pink, red, white range and fit (which actually ruled out a lot). And then Kendall and I made some quick decor and props out of some craft supplies I had stashed away from other projects.
Kendall helped me cut hearts out of felt and I hot glued them to ribbon to make streamers for our background, which was set against our barn doors in the office. Then we made a couple pennants out of felt for the kids to hold.

Man, I can do almost anything with felt and a little hot glue. Those are the supplies I’m hoarding for the end of the world. We got a handful of cute pics, mostly thanks to some jelly beans.. okay, a lot of jelly beans.


Of course, my kids love to play up their “photographer’s children” syndrome and fight my requests for sweet poses. (That one up there? TOTALLY LUCKY shot.) BUT, fortunately my friend’s kids are not quite there yet, and I wound up getting a sweet shot of miss A showing off her pennant.

The pennants have turned out to be a big hit with the kids. They like to run around and wave them. Kendall likes to “decorate” his room with them. They were so easy to put together, I didn’t even think of documenting the process for a tutorial at the time, so I went back and made another one today to show you all how it’s done. You can use this same concept for any season, holiday or reason. They make adorable photo props!
What you need:

3 colors of felt, less than 1/2 a yard of each (or scraps for 2 colors)
1 12″ wood dowel (I purchased these in the cake decorating section at the craft store.)
Hot glue gun and glue sticks
Ruler
Siccors
Take one piece of felt (the largest, and the one that will make up the majority of the pennant) and fold it in half. Along the fold measure 8″ inches across from the edge of the felt. Make a mark or a small snip with your scissors. Also make a mark (but not a snip!) at 4″ (or halfway across).
At the 4″ mark, place your ruler perpendicular to the fold of the felt and measure down 11″ for a medium sized pennant or 14″ for a large pennant and make a mark.
The pennants the kids are holding in their Valentines pics are large. The one I made for this tutorial is medium.
Line your ruler from the 11″ or 14″ center mark all the way up to the 8″ width mark or the edge of the felt at the fold and draw a light line. Cut along these lines for a perfect triangle.

Next, using the same method, cut a smaller triangle from your second color of felt. This time, though, there is no need to fold it in half. Just use the edge of the felt as your guide. For the medium pennant, I cut a triangle 5 x 7″. For the large pennant, I cut a triangle 6 x 11″.

To make the heart, I simply folded this triangle in half and cut one out.

Then go ahead and cut a 1.5 x 8″ piece of felt from your 3rd color and set it aside.
Unfold the large piece (the pennant) and hot glue the wooden dowel down the middle.

Fold the pennant back in half, over the wooden dowel, and hot glue all the edges together. You’ll probably have to apply a little extra hot glue near the top and the bottom of the dowel.
Place the 1.5 x 8″ piece along the edge of the pennant, and trim the edges to match the angle. Then hot glue that down.

The last step is to line your smaller triangle up, centered along the bottom edge of the accent piece you just glued down, and glue it down.
Tada! It is so super simple and a really fast project.

We’re brainstorming 5th birthday party ideas for Kendall now, and he’s leaning toward a baseball party. I’m starting to envision a few nights of making pennant party favors.
In my fantasy world, this baby gets a room of his or her own that I get to lovingly decorate for really no reason at all other than to be an expensive room to change diapers in for the first 5 months.
Reality is this baby will likely not have a room of their own for quite some time, and all they will get is a co-sleeper and who knows what we’ll do with all their clothes.
But I like my fantasy world better. It keeps me occupied when I’m up late with pregnancy insomnia. So I designed this emerald and orange boys bicycle nursery tonight, you know, for fantasy fun.
I really love this year’s Pantone Color of the Year- emerald green. It is a gorgeous, rich color that works beautifully for boys, girls, home decor, fashion, everything.
So I took my inspiration from that and a sweet bicycle fabric I stumbled upon on CityCraftOnline.com (the same fabric store that helped me dream up Leyna’s PB&J Tiny Traveler nursery).
I also took into account that even in my fantasy world, I wouldn’t have time to sew everything this time, so I found some pre-made sheets and bedding at Pottery Barn Kids in a neutral gray chevron that works nicely. I would make the bedskirt and crib rail guard from the bicycle fabric, adding some orange polkadot fabric for accent pieces.
I love that Polyvore has made it so easy for me to link you to all my inspiration (so much found on Etsy!).
The only thing that’s not linked is the crib, and that’s actually our crib that we got years ago when Kendall was born from Babies R Us. It’s no longer sold, but we do love it so. I’m glad I fought hard to find clean lines in a crib less than $1k 5 years ago! Now there are so many great, inexpensive options out there. Check out this one from Ikea!
Since we don’t know what we’re having and won’t be finding out until he or she is born (Yes! Team Green! How very 2013 and trendy of me.) I’ll, of course, have to design a little girl’s emerald nursery next. Stay tuned!


