Baby Rabies
  • Start Here
    • About Baby Rabies
    • Baby Registry Top Picks
    • Favorite Pregnancy Apps
  • The Book
  • Pregnancy
    • Birth Stories
    • Perinatal Mood Disorders
  • Parenthood
    • Babies
    • Toddlers
    • School Age Kids
    • Parenting LOLZ
  • Photography
    • Photography

      6 Stunning Photos You Would Never Guess Were…

      February 11, 2019

      Photography

      Simple Tips For Editing Snow Photos On Your…

      December 13, 2018

      Photography

      I Wrote A Photography eBook And This Is…

      December 6, 2018

      Photography

      Creative Lighting Ideas To Help You Take Great…

      November 27, 2018

      Photography

      Learn How To Take And Edit Photos On…

      November 19, 2018

  • Reviews
    • Reviews

      The Answer To Last Minute Holiday Gifting For…

      December 19, 2018

      Reviews

      I Was Never A Barbie Girl Until Now

      October 1, 2018

      Reviews

      Finally! Jeans For My Jean-Averse Kids!

      August 22, 2018

      Reviews

      If Your Kid Loves Dump Trucks & Garbage…

      August 13, 2018

      Reviews

      Nobody Tell My Kids ABC Mouse Is Part…

      September 4, 2017

  • Subscribe

Baby Rabies

pregnancy & parenting

  • Start Here
    • About Baby Rabies
    • Baby Registry Top Picks
    • Favorite Pregnancy Apps
  • The Book
  • Pregnancy
    • Birth Stories
    • Perinatal Mood Disorders
  • Parenthood
    • Babies
    • Toddlers
    • School Age Kids
    • Parenting LOLZ
  • Photography
    • Photography

      6 Stunning Photos You Would Never Guess Were…

      February 11, 2019

      Photography

      Simple Tips For Editing Snow Photos On Your…

      December 13, 2018

      Photography

      I Wrote A Photography eBook And This Is…

      December 6, 2018

      Photography

      Creative Lighting Ideas To Help You Take Great…

      November 27, 2018

      Photography

      Learn How To Take And Edit Photos On…

      November 19, 2018

  • Reviews
    • Reviews

      The Answer To Last Minute Holiday Gifting For…

      December 19, 2018

      Reviews

      I Was Never A Barbie Girl Until Now

      October 1, 2018

      Reviews

      Finally! Jeans For My Jean-Averse Kids!

      August 22, 2018

      Reviews

      If Your Kid Loves Dump Trucks & Garbage…

      August 13, 2018

      Reviews

      Nobody Tell My Kids ABC Mouse Is Part…

      September 4, 2017

  • Subscribe

no-sew

DIY No Sew Christmas Tree Skirt
Crafty!

DIY No Sew Christmas Tree Skirt

by Jill December 8, 2014
written by Jill

You know what’s an odd thing I’ve craved since having children? A Christmas tree of my own that will only have matching ornaments. Some of them even breakable! And none of them made from popsicle sticks and Elmer’s glue.

Listen, it’s not that I don’t love those little popsicle stick ornaments that my children lovingly paste together. I cherish them, I promise. I’m not heartless.

I couldn’t pass up the opportunity to get a 2nd tree for our new house, though, since we have the space… and there was a really great Black Friday sale. So this one is alllllll mine.

Since I have to start from scratch, my budget was really limited, and I couldn’t spend a lot on the tree skirt.

I also can’t find my sewing machine right now. So many boxes. So. Many. Unpacked. Boxes.

I did, however, find a lovely round table cloth at Target for $14, and I came up with a plan.

EASY! No sew tree skirt from a round table cloth | BabyRabies.com

I bought some Fray Check, and 2 spools of coordinating satin ribbon (silver and gold for my new grown up tree theme).

Then I busted out the iron and my trusty glue gun.

EASY! No sew tree skirt from a round table cloth | BabyRabies.com

Round table cloth
Fray Check 
Ribbon of your choice
Glue gun
Iron
Flat surface to work (ironing board works fine)
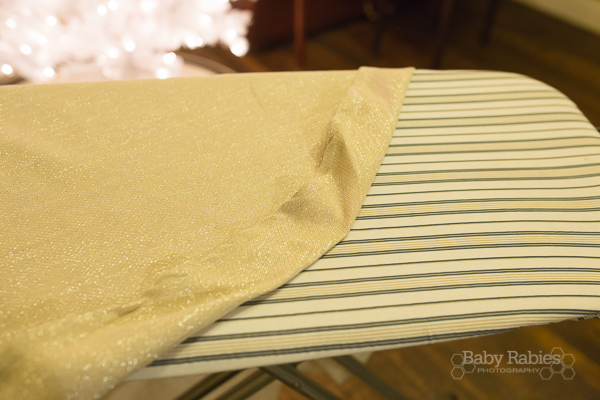
EASY! No sew tree skirt from a round table cloth | BabyRabies.com

I started by laying the table cloth right side down on the ironing board, and folding a few inches in, then ironing a crease all the way around. This is simply going to help you when it comes time to glue it. Don’t worry if it doesn’t stay folded as you go. The crease line will still be there.
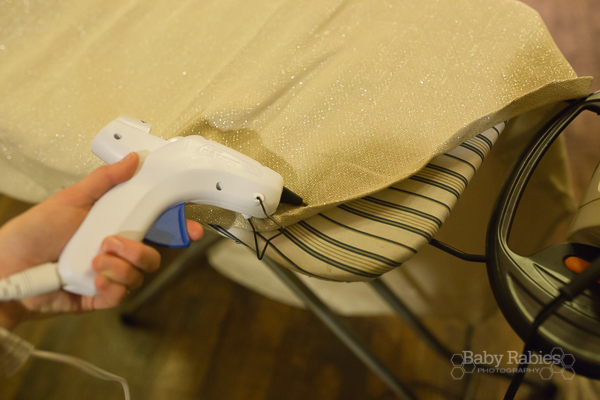
EASY! No sew tree skirt from a round table cloth | BabyRabies.com

Then just run a bead of hot glue at  the top of your table cloth and fold it over. I kept this a few inches deep so that I had plenty of space to work my ribbon through later. Since it’s round, you’ll have to make a sort of pleat every 8 inches or so. DON’T stress about keeping this perfect!

EASY! No sew tree skirt from a round table cloth | BabyRabies.com

Don’t close it all the way up. Leave a small gap for now.
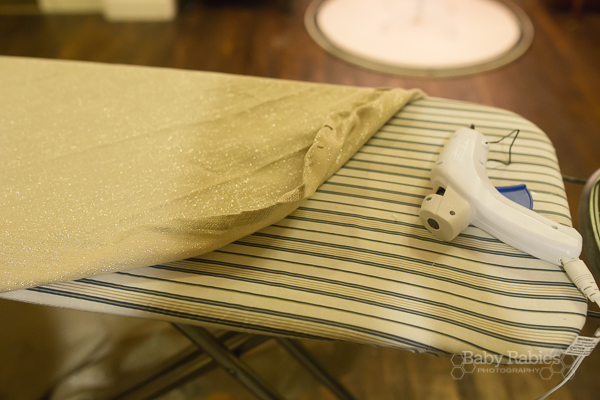
EASY! No sew tree skirt from a round table cloth | BabyRabies.com

Cut a slit, about an inch tall, in the right facing side of the table cloth, near what will now be the top (by the crease). This is hard to describe. Check out the pic.
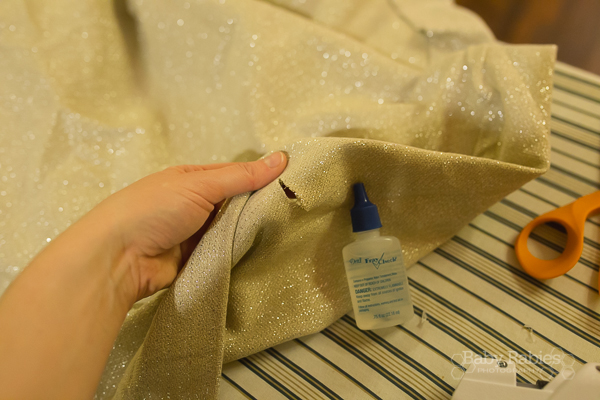
EASY! No sew tree skirt from a round table cloth | BabyRabies.com

Make sure it doesn’t extend beyond where the hot glue will be on the back after you seal it up. Then apply the Fray Check to the edges and let sit for about 15 minutes. Don’t worry too much about this looking unfinished. The bow will completely cover it.

Tie a large knot at the end of your ribbon. This is what you’ll grab onto to help work it through the top of the table cloth. Since I used 2 ribbons, the knot was big enough. If your’s is too small, try pinning a large safety pin to the knot to give you something more to grab onto.

EASY! No sew tree skirt from a round table cloth | BabyRabies.com

Slip it into the open part of the fold, and begin to work it around the inside of the hem. This will take a little while, be patient.

Once you get it all the way around, bring both ends of the ribbon(s) through the slit you cut. Then glue the rest of the hem shut.

EASY! No sew tree skirt from a round table cloth | BabyRabies.com

Now, very gently, begin to cinch it up like a sack.

EASY! No sew tree skirt from a round table cloth | BabyRabies.com

Place it under your tree, and continue to cinch it all the way up around it, finishing it off with a big bow. You can trim your bow ends if you’d like, but I loved the look of the trailing tails.

EASY! No sew tree skirt from a round table cloth | BabyRabies.com

This isn’t a very big skirt, but we needed it to be smaller to accommodate the train tracks that my husband built.

If you’re looking for a bigger skirt, use a bigger table cloth. For reference, the one I used here was 70″.

Total cost for this project was about $20. Total time was about 40 minutes.

December 8, 2014 2 comments
0 FacebookPinterestWhatsappEmail
No-Sew Infant Parrot Costume Tutorial
Crafty!

No-Sew Infant Parrot Costume Tutorial

by Jill September 13, 2011
written by Jill

My years are numbered. I won’t be able to dictate what Kendall is for Halloween much longer, and I won’t be able to coordinate him and Leyna in costumes for more than a year or two if I’m lucky. My top two choices this year were either a magician and his white rabbit or a pirate and a parrot. I let Kendall think he had some say in the whole thing and asked if he’d rather be a magician or a pirate.

“I wanna be Jake the Nevuhland Piwate!” he declared, and so we went with that.

Honestly, I have no clue what I’m going to do for his costume yet, but I thought all summer how I would put Leyna’s parrot costume together. I decided I would finish it today so I could forget that it’s ONE HUNDRED AND SIX DEGREES (stab, stab, stab TX summers)and pretend fall is here.

Believe it or not, this is the first Halloween costume I’ve ever made. ZOMG. I die from the cute.

What you’ll need:

Not a sewing machine!! Or a thread or needle of any sort. Don’t you just love me right now?!

A onesie you’ll use for the body-Leyna’s is a boys red turtleneck onesie from Carters. Bought it yesterday for $8. It is important to note that at Carters (and maybe elsewhere) the snaps for the girls turtlenecks are down the back and the boys are on the side. Do not get one with snaps down the back.

3 colors of felt– I used about 1/4 yard of each color for Leyna’s wings, but I’d suggest getting at least a 1/2 a yard so you have extra to work with, unless your wing span is going to be really tiny (more if your wings are much bigger).

2 feather boas– These are of the craft variety, with very fine feathers. I got them at Hancock Fabrics yesterday for about $5 each.

Scissors, hot glue gun + glue sticks, measuring tape, pen

Put the onesie on your baby and use a pen to mark where the top of the feathers on their butt should go and where they should end. I started Leyna’s just above the top of her diaper.

Measure the wingspan, from the seam of one wrist cuff to the next. Since the sleeves will naturally point down a bit, place your measuring tape across the back at the neck and measure a little above each sleeve if you need to.

Then measure from the top of the shirt (below the neck if it’s a turtleneck) down the middle of the back to determine how long you want the wings to be. I made Leyna’s stop 2 inches above where I wanted to start the feathers on her butt.

I determined Leyna’s wings would be 29″ by 9″ on her 24 month onesie. (Yes, she will only be 10 months at Halloween.)

Cut the first color of felt, the color you want at the bottom of the wings, the width of the wingspan you’ve determined. Then fold that in half and mark the length on the fold.

Starting at that point on the fold, cut up to the top corner, rounding it as you go.

Notch the edges to create “feathers.”

Do the same thing for the other 2 colors, but subtract 10″ from the width for the 2nd color and 20″ from the width for the 3rd color. Also, subtract 2″ from the length for the 2nd color and 4″ from the length for the 3rd color. For example:

Leyna’s final wing measurements
Blue- 29″ by 9″
Green- 19″ by 7″
Red- 9″ by 5″

If you’re making wings that are much bigger or much smaller, you might need to tweak these measurements. Do what you think will look best. This is why I suggest having extra felt. 

Laid out on top of each other, they should look like this:

Hot glue the top edges together by flipping each one up and running a bead of hot glue between the 2 layers.

I made sure they were really secure by applying another row of hot glue just below the first, but I didn’t glue the entirety of each layer of felt to the next so that it would look more like feathers and move better with her.

Place the wings, top (layered side… the one you want showing from the back) down, then place your onesie, belly side up, on top of it. Take a look at what the wings will look like from the front. I wanted there to be a little color peeking through from that view, too, so I cut a layer for each side that was about 10″ by 8″.

Again, I just hot glued under the straight edges and let the “feathers” be free. It looks like this from the front. (Keep in mind, at this point, you still haven’t glued the wings onto the shirt.)

To glue the wings onto the onesie, you may want to start by putting a piece of cardboard inside. I didn’t have any issues with the hot glue seeping through, but I’d hate for that to happen to anyone. This will be pretty important to do if you’re using fabric glue instead of hot glue.

Flip everything back over, make sure the back of your onesie is facing up, then line up the center of the wings and run a bead of hot glue from right below the neck to about an inch above where your wings will stop.

To attach the top of the wings, start at the middle and work out toward each end, a few inches at a time, one side at a time. Stretch the arms to meet the top of the wings until you get toward the end.

It will start to get difficult to get everything to line up around this point, so just go ahead and glue the sleeve down to the wings and trim the excess off the top.

Now you’re ready for the feathers on the butt. You may need to trim a string off the end of your feather boa. If you do this, put a dot of hot glue on the raw edge to keep it from… molting.

Start at the mark you made at the top of the butt. Glue your first color boa across the top of the butt, then back the other way. Again, when you cut it off, add another big dot of hot glue to the raw edge.

 Do the same thing for the second color feather boa right below that. You’ll end up with something that looks like this from the back:

And if you put it on a chubby baby, you’ll end up with something that looks like this:

Now, I can’t take credit for this next part, but the cherry on top of this whole getup is this FABULOUS feather headband made custom by Bella’s Bowtique. 

This photo shoot wouldn’t have happened without Aunt Kelly’s watch. I tried like hell to get a picture of her without that freaking watch in her mouth. This was the result.

She literally screamed, “DADA!”  as I shot this, as if she was telling on me and Aunt Kelly for torturing her and not even letting her chew on a little ol’ watch while we did so.

So she won. The watch was promptly returned to her chubby hands.

September 13, 2011 28 comments
0 FacebookPinterestWhatsappEmail

@babyrabies

  • I haven’t taken many bump pics, but I’ve practically lived in the same three outfits since the beginning, and I’ve worn one of my three pairs of @blanqigirls Everyday Maternity Belly Support Leggings every 👏 single 👏 day 👏 for the past five months. 
They were great in the beginning when I was more bloated than bumpin’, and are lifesaving now that this bump has become a little more burdensome. I won’t shut up about them. Their Black Friday Sale is still going on, and these leggings are 50% off with code BLANQI50.
  • Five years ago I got this cute flannel dress for 80% off at The Gap. When the cashier was checking me out she said in a small voice, “um, you know this is a maternity dress, right?” I did NOT know that, but replied without skipping a beat, “yes, I’m expecting!” and spent the whole ride home wondering to myself 1. why it was her business if I knew what I was buying 2. why I blurted out a lie so quickly 3. if I’d ever actually wear it. 
I kept it. I wore it! Lots before getting pregnant, and for the first time as a “maternity” dress today. 
PSA - underneath I’m wearing @blanqigirls maternity leggings and support tank, which should be every pregnant woman’s uniform and they’re having a KILLER SALE right now.
  • No longer in the “could just be tacos” phase. 🌮 👏 🤰🏻
  • I just wanted to take a picture under the words GOAT SCALE, but I’m now realizing there were many, many missed opportunities for creative placement.
  • Starting all over with a new FB page! If you want to follow there, the link is in my bio. The blog will officially relaunch soon! #babyrabies
  • We haven’t purchased a single baby thing yet. I’ve meandered into the baby section at stores lately, but for some reason I feel silly even perusing the racks. But after my OB appointment this morning, I ran to Target for... literally no other reason than it drew me in with its gravitational force. I spent about 10 minutes looking for tops that fit that aren’t long sleeved or flannel tunics, but quickly gave up. On my way out I rushed through the baby section, barely looking, and out of nowhere I made the very first baby purchase... which felt surreal, but not nearly as surreal as feeling it move for the first time yesterday. I was worried I wouldn’t be sure when it happened, but it was pretty dang unmistakable, and odd, and... yup. I guess there really is a baby in there. Weird.
  • It’s the first day of Fall (or the first day of Summer Part Deux for us southerners) and finally, finally pregnancy is manifesting itself as something more than sheer exhaustion, boobs, and moods. My hair is magically happier this week despite literally months of straight up neglect (seriously I desperately need a chop), my nails somehow survived an out of state work gig that required lots of lifting and tinkering and my nails never survive events, my skin is behaving itself suspiciously well, aaaaaand I haven’t pooped in 3 days (which I’m much less excited about obviously). My bump still pales in comparison to some burrito babies I’ve had, but it’s nice feeling like exhaustion and titties are no longer the only thing I have to show for all this.
  • I do not take for granted that I work for myself and can nap when I need to, at almost any time I need to. 
I do not take for granted that the only beings I’m responsible for are four-legged and pretty chill. 
I do not take for granted that I have a partner who gladly cleans the house on Sundays while I nap for 70% of the day. 
And I definitely do not take for granted the tiny procrastinator I am housing who I’m pretty sure puts off all its growing for the week to the last 48 hours and crams it in at the end rendering me semi-conscious and starving every weekend. (Not pictured: the drool on the other side of my mouth)
  • We joke that @jillkraus.e had my child when she had her daughter Leyna. We have a lot in common, mainly our smirky face and love of all things pickled. But truth be told, she was SO suspicious of me when she was a baby. Like, I *looked* like her mom, but I wasn’t her mom, she didn’t trust this dark haired doppelgänger whose boobs were useless. (posting throwbacks because still not much going on over here to see besides exhaustion and looking like a kinda bloated porn star. 😳)

Buy Jill’s Book

50 Things to Do Before You Deliver: The First Time Moms Pregnancy Guide

Up Your Phone Photography

  • Facebook
  • Instagram
  • Pinterest

©2019 | BabyRabies.com


Back To Top